Showing posts with label Projects. Show all posts

Tuesday, January 10, 2012

Custom Kitchen Cabinets

So, by now I am sure you get the point that we were on a mission to make our kitchen more functional and organized during our time off. We customized our pantry {more about that here} and customized our kitchen drawers {more about that here}. The next and last item on our agenda was to make an easy to access space for our pots and pans. Up until now they were crammed in to the back of a corner cabinet and you were likely to be injured if you attempted to get one out. After much searching on the Internet we really loved the fancy pull out drawers that a lot of the high end kitchens have. Which got Talon's wheels to spinning and the idea of making our own custom pull out drawers evolved....
This is a bottom cabinet and used to hold unnecessary kitchen items {ex: crock pot - could totally be re-located to a less easier to reach location since we do not use it on a daily basis}. So, it was a prime candidate for the mini-makeover.
This is how Talon said we did it {my portion was all moral support}: We measured the cabinet opening and determined the location of the trays. We then glued and tacked in some support risers for the slides {which we purchased at Home Depot} to be screwed into. We then had to determine the height that the slide needed to be, leveled it, then screwed them in {this had to be done for both sides and both drawers}. Up next it was time to build the drawers themselves. We measured the distance between the slides to determine the drawer width. The MDF that we were using was cut down to the appropriate width. We also had to cut strips that equal the depth that we wanted the drawers to be. Once everything was glued and nailed together all we had to do was mount them on the slides.
This has by far been the greatest thing we have done in our kitchen. It's no longer a fight to get a pot or a pan for cooking. We simply open the cabinet and pull out a drawer. The slides that we used allow the trays to extend all the way out of the cabinet making it even easier to grab things from the back. That wraps up our kitchen organization/customization craziness but we are already brewing other ideas for the future!  

Wednesday, January 4, 2012

Pantry Makeover

Talon and I had 10 full days off of work. It was glorious! Of course, several of those days were filled with Christmas activities but I had a big plans for the others....
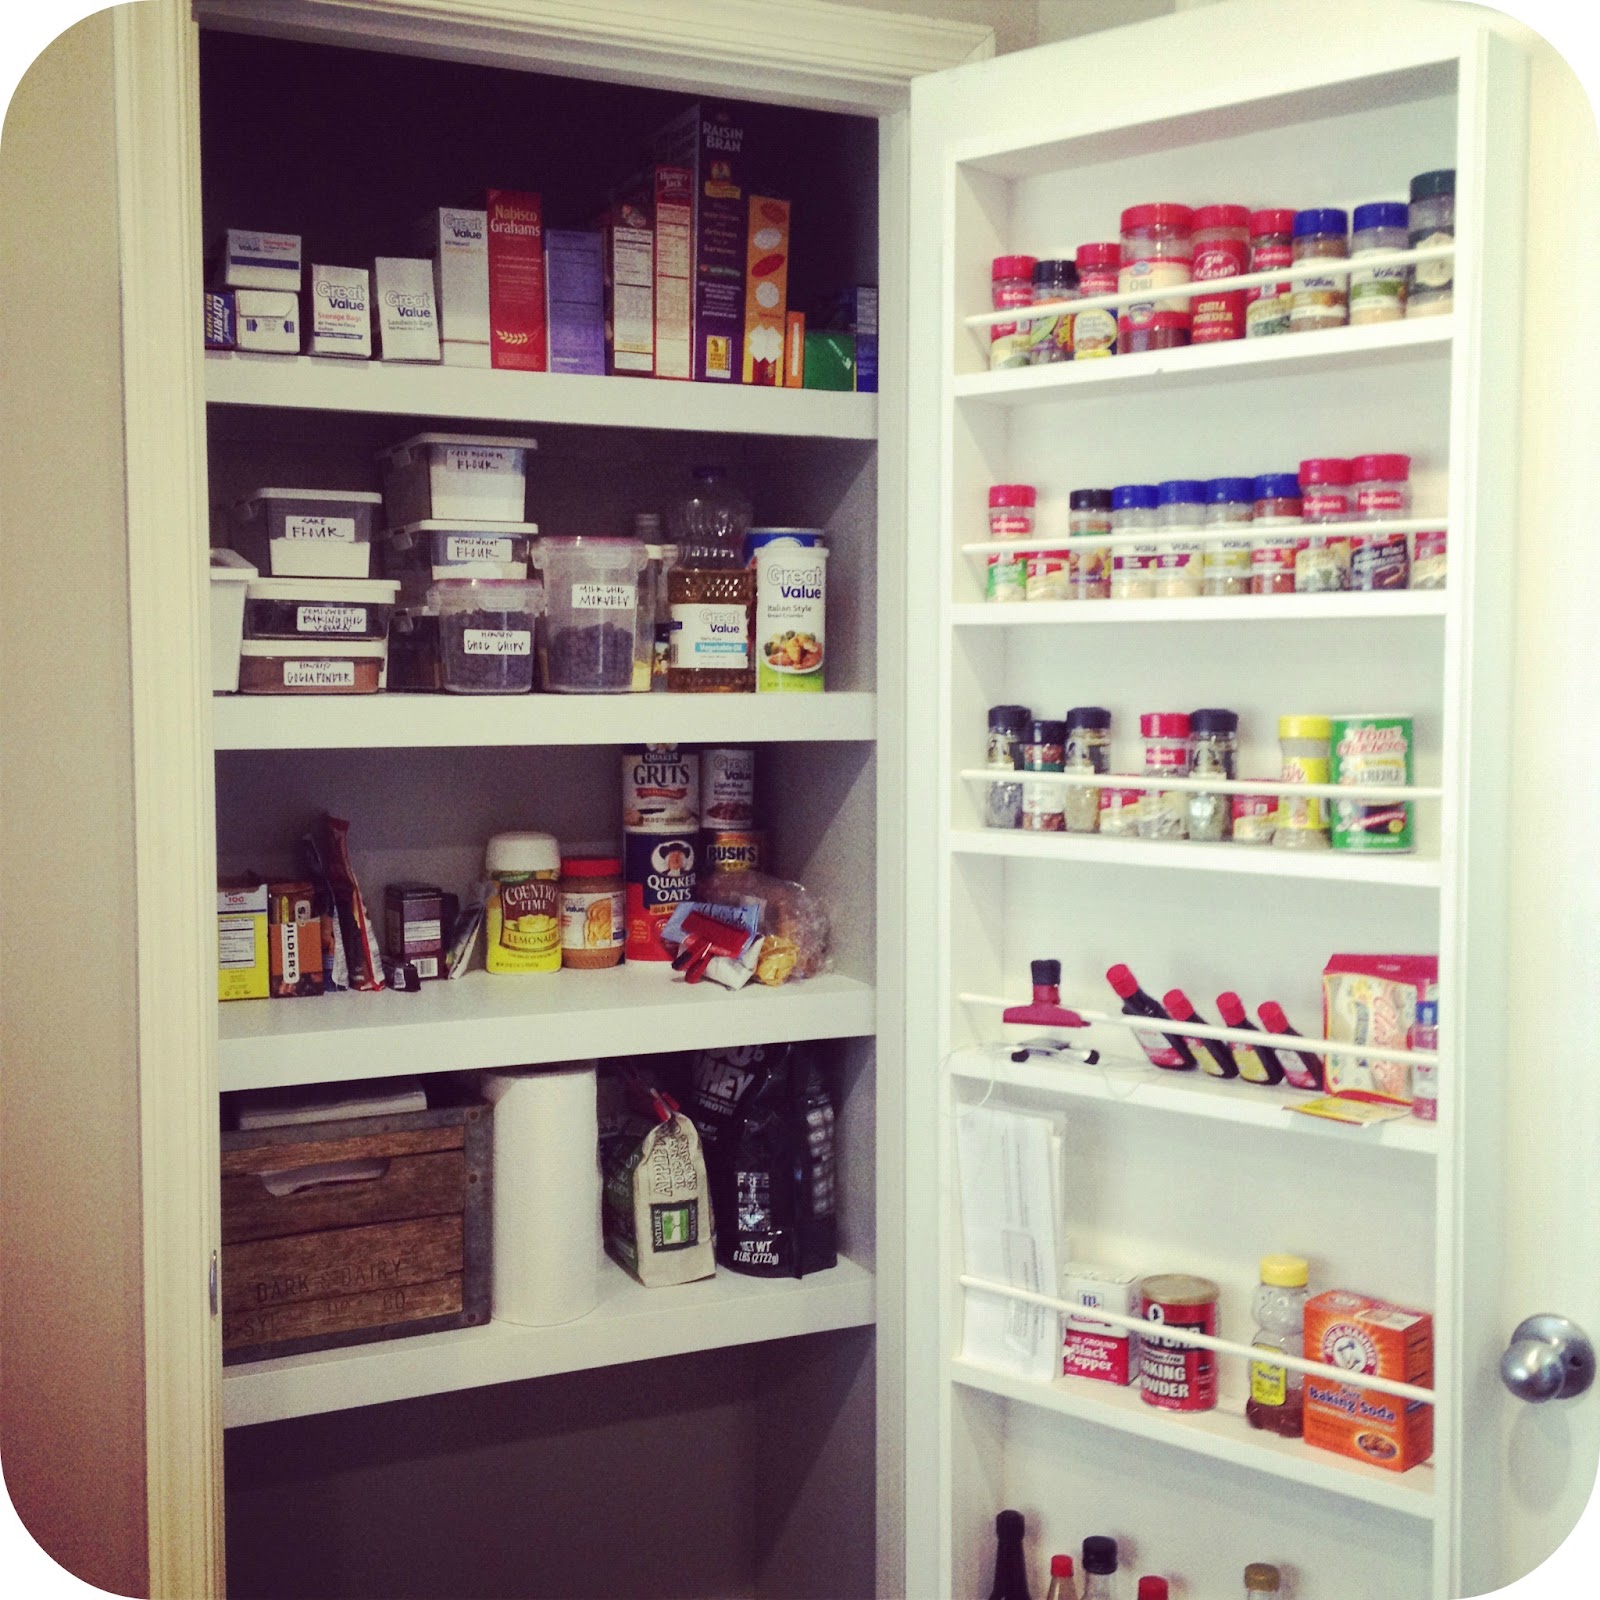
Yep,a Christmas vacation 'to do' list. Have I mentioned that I have no idea how to relax? Literally, I can't sit still. If I do, I go straight to sleep. Lucky for me...Tal was on board for the majority of the list. In case you have trouble reading here is a quick run down. 1. Pantry {More about that in a minute} 2. Go to Movies {Had to have fun stuff to look forward to! Plus we never do this because it is SO darn expensive.} 3. Clean Oven {The inside of course. Just one of those things we never get around to doing}. 4. Wash Duvet {Easy task. I love to check things off a list} 5. Organize Attic {Not so easy task but was a great time to do it since we would be putting up Christmas decor} 6. Starbucks Date {So fun} 7. Clothes Shopping {This was for Tal - I have no problem making time to clothes shop for myself:)} 8. Paint Office {More on that later} 9. Stencil Office {More on that later} 10. Fish Scale Art {More on that later} 11. Ping Pong {Nothing better than a little competition to spice the week up} 12. Drawer Organization {Again, more on this later in the week}How's that for a Christmas Vacation? It was SO much fun though. Talon and I love doing projects together...nothing better than quality time spent covered in dust and paint:) So, first on the list was our pantry. Not to long ago we built a custom spice rack for the back of our pantry door. More about that here. It has been so wonderful that we wanted to do some more updates in the ol' pantry. See those ugly wire shelves....
We wanted to get rid of them and that is what we planned on doing. Here is how....First up, removing all of the wire shelves and hardware. We plan to craigslist them to cover some of the cost of the new shelves.  
Once done, we were left with lots and lots of holes to deal with. 
We used Spackling to patch all of the holes. It's purple when you apply and turns white once ready to be sanded down. Making it very easy to use.
After the holes were patched I gave it a nice coat of paint to pretty it up. Luckily, I was already painting the office (remember that was on our to do list too) and the color was only a hair darker than what our kitchen is so I was able to use that and it blends very nicely!  Once all the prep work was done we were ready to tackle the big stuff...the shelves themselves. We purchased and sanded pine plywood ($26, 4x8 sheet), 6ft 1x6 select pine for facing and 3 1x2 select pine for the shelving cleats. Once we found the studs in the pantry we then determined appropriate shelf depth. We then cut the cleats to the appropriate length. Pre-drilled and countersinked the cleats to the pantry wall with 3" drywall screws. The pantry shelves were cut out of the sanded pine plywood to the appropriate depth and width and nailed in place with a nail gun. 
We then measured and ripped down 1x6s to the appropriate width for the facing. They were then nailed in place with the nail gun. All seams were caulked and wood filler was used on the joints. Allowed to dry and then it was all sanded....
After a fresh coat of white paint....they were ready to hold all of our daily necessities!
No more falling through the cracks of the wire shelf. We can utilize the entire space and it glorious!
We've been collecting storage containers from IKEA to help organize this space.The labels are hand written so they can be removed and modified easily depending on what is being stored in each piece.
Is it weird that when anyone comes over I want to scream "look how awesome our pantry is!"??? Yep, we love it that much. Between the spice rack and all the added shelf space it's perfect!
Total cost for this pantry makeover (shelves only) was around $50.00 (excluding things we already had like paint, wood filler, nails and the fact that we only had to use 1/2 the sheet of plywood). We think it was well worth the time and money spent since the pantry is something we utilize every single day. Anything to make life a little easier!

Thursday, December 22, 2011

Glass Lamp

Getting so close to Christmas I can hardly stand it!! So excited for all of the festivities. However, there's still a day of work left. Let's make that go faster by looking at our updated lamp....
That's what it looked like when my mom and I picked it up at a yard sale a few months back. I've seen this glass lamp style everywhere over the past few months.
Although this one wasn't exactly a looker at first I had high hopes that we could dress it up with a can of spray paint.
I was able to pull the whole thing apart (kinda) via a bolt on the bottom.
I cleaned it up really good and taped off the important stuff so that spray paint would not touch it.
1 can of Oil Rubbed Bronze later....
It didn't turn out to shabby at all and I have to admit I had my doubts.
I picked up the lamp shade at Target. I think it's a tad small for the lamp but it will do for now.
I love that I could potentially fill that glass lamp base with whatever I wanted. For instance, Christmas decor! Why am I only thinking of this two days before Christmas?
What do you think? Any comparison to those with the high price tags?